Qu’est-ce qu’une vis sectionnable ?

Les vis à rupture, ou vis à casser, offrent une solution pratique pour éviter le gaspillage de vis standard. Elles fournissent exactement le nombre nécessaire, réduisant le gaspillage et offrant une certaine flexibilité. De plus, une méthode est décrite pour les ajuster à la longueur souhaitée. Ces vis sont désormais incluses dans certains produits de quincaillerie pour contre-portes.

Les vis à rupture, également connues sous le nom de vis sectionnable ou vis à casser, sont des vis plus longues qui présentent des points de coupe à différents incréments d’un quart de pouce sur la longueur de la vis.

Contrairement aux paquets de vis standard qui sont livrés avec la quincaillerie ou achetés séparément, les vis à rupture de pont offrent à la fois une polyvalence et une agence pour l’utilisation des vis. Elles constituent en outre une option écologique. Poursuivez votre lecture pour en savoir plus sur les vis à rupture brusque et sur quelques méthodes pour les couper à la longueur souhaitée.

Les avantages des vis de rupture

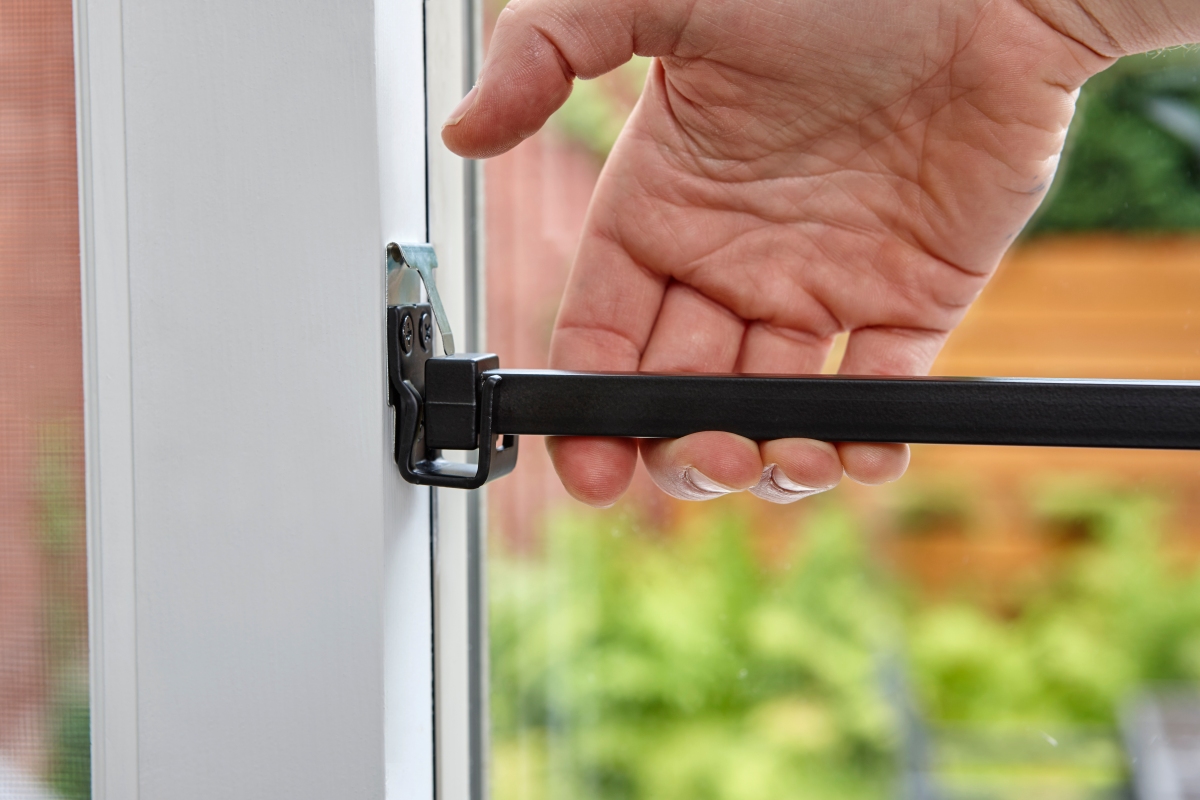
Lorsque vous achetez de la quincaillerie de remplacement pour votre maison, comme des pênes dormants et des poignées pour une porte moustiquaire, vous recevez souvent un paquet de vis avec de nombreuses vis destinées à différentes épaisseurs de porte. Il faut alors trier, mesurer et éventuellement perdre des vis, pour n’en garder que deux dont on a réellement besoin, le reste étant laissé à l’abandon ou gaspillé.

Les vis à rupture de pont résolvent ce problème en fournissant exactement le nombre dont vous avez besoin, généralement 2 pour les poignées de porte et les pênes dormants. Pour réduire l’encombrement inutile et faciliter la recherche et l’utilisation des bonnes vis pour les bons produits, une partie de la gamme de produits de quincaillerie pour contre-portes d’Ideal Security (listée ci-dessous) comprend désormais 2 vis à rupture de 3 po.

Les vis à rupture offrent également une certaine flexibilité ; vous pouvez ajuster leur longueur à vos besoins. Si vous préférez utiliser les vis de votre quincaillerie de contre-porte existant, ces vis réglables peuvent être facilement réutilisées pour d’autres projets. Il suffit de couper la longueur excédentaire selon les besoins.

Comment couper les vis de rupture

Avec les bons outils et une bonne prise en main, vous pouvez couper les vis à tête cassante à la longueur souhaitée. Regardez notre guide vidéo étape par étape pour apprendre à casser vos vis de rupture, et suivez les instructions ci-dessous.

Pour découper une vis de rupture, il suffit de :

  • 1 à 2 pinces (ou un outil de serrage similaire)
  • 1 mètre ruban ou règle
  • 1 gabarit de vis Ideal Security pour le matériel à installer

  1. Tout d’abord, mesurez l’épaisseur de votre contre-porte, de la surface extérieure (où est installée la poignée ou la serrure à pêne dormant) à la surface intérieure (où est installée la serrure intérieure ou la serrure à pêne dormant).
  2. Une fois que vous avez mesuré l’épaisseur de votre porte, se référer au gabarit de vissage fourni avec la quincaillerie de votre contre-porte Ideal Security – l’épaisseur de votre porte sera associée à la longueur de vis que vous devez couper.
  3. Après avoir identifié l’encoche de la vis qui doit être coupée, prédécoupez votre vis. Pour ce faire, serrez la pince sur l’encoche, tournez la vis d’un quart de pouce, serrez à nouveau et répétez l’opération 4 à 8 fois. Une deuxième pince peut être utilisée pour maintenir la vis en place.
  4. Saisissez l’encoche prédécoupée avec la pointe de votre pince et appliquez un léger mouvement de haut en bas pour casser l’encoche de votre vis de rupture. Si la vis a été correctement prédécoupée, l’encoche devrait se détacher sans qu’il soit nécessaire d’exercer une force excessive.

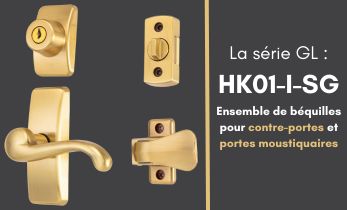
Poignées et pênes dormants pour contre-portes – Désormais avec vis de rupture

Dans le but de promouvoir le respect de l’environnement et de réduire les déchets, nous avons commencé à introduire des vis sécables dans certaines de nos gammes de produits, dont le lancement est prévu entre janvier et juin 2024. La gamme de produits comprend :

La série de serrures à clé pour contre-portes 703

La poignée tirante pour contre-portes VP

La poignée tirante pour contre-portes CS

La poignée de tirage 4390 pour contre-portes et la série de barres tactiles intérieures

La série de poignées de tirage pour contre-portes LSDXCR2267

La série de poignées de tirage pour contre-porte DX

La série de levier pour contre-portes EL

Vous avez des questions ou des préoccupations ? N’hésitez pas à nous contacter ! Vous pouvez nous contacter ici ou visitez notre gamme complète de produits de remplacement de quincaillerie de contre-porte.

How Do I Use A Ladder On Stairs?

Using a ladder on stairs isn’t as easy as it sounds, but with the right preparation and tools, you’ll be ready to climb like a pro. Read on to learn the essential tips and tricks to use a ladder on stairs.

You’ve got a ladder, you’ve got a staircase, and you’ve got a high spot to reach. Maybe you’re planning on using that ladder for painting on stairs, hanging up a portrait, or doing some HVAC work on stairs. But the fact of the matter is, using a ladder on stairs is no easy feat. At least, not at first glance.

Read on, and we’ll walk you through key elements to consider and answer how to put a ladder on stairs.

Haven’t picked out the right ladder to use on stairs yet? Check out our previous blog post, where we go over popular styles of ladders for stairways and discuss what ladder duty ratings actually mean.


It may seem like there’s a straightforward solution to using ladders on stairs. Prop it on a box, lean it against a wall, and get to climbing, right?

Not exactly. Let’s work our way through each step of the above sentence and point out the errors, beginning with the box.


A Stable Surface

While single ladders, extension ladders, and (in certain configurations) combination ladders are of the few ladders that are not bound by regulation against the use of stabilizers and levelers to create a level surface for your ladder, the quality of the surface matters.

For starters, the leveling tool can’t be as unstable as a standalone box, barrel, or crate – ladder accessories must be mounted directly on your ladder to ensure stability. Other leveling tools that don’t fall under the umbrella of “accessory” don’t necessarily need to be mounted to a ladder, but they should come with their own self-supporting capabilities that can withstand slip tests.

Only, it’s not just a matter of stability. Gluing a plastic box to the feet of your ladder won’t exactly cut it. You need to ensure that the accessory or tool you’re using can:

  • Support the weight of the ladder
  • Support the weight of the person using the ladder
  • Support the weight of the equipment used by said person on the ladder
  • Support the weight of tools being carried, stored, and used by the equipment-laden person on the ladder

Otherwise, the stability and levelness of your leveling tool is a moot point if your ladder breaks right through it. Your leveling tool or accessory should be capable of supporting at least 4x the duty rating of your ladder and preferably be made of steel.

If you’re looking for a ladder leveler for stairs, then look no further than the Ladder-Aide PRO. This all-steel ladder tool can support up to 1500lbs, is micro-adjustable to 1/8″ increments, and is built to accommodate North American stair standards.


The 1 In 4

So if you’ve got a stabilizing tool for your ladder that is both stable and capable of supporting the weight of you and your ladder, we’re now ready to address the next error of that initial sentence: “lean it against a wall”.

Although the heart of that line’s in the right place (you absolutely should lean your ladder against a wall or flat, stable surface), there’s a bit more to math out. Specifically, you need to consider the angle of your ladder placement, the height of your ladder, and the width and step height of the stairs you’re working on.

The acceptable angle for a ladder to be at, relative to the surface it’s placed against, is 75° (specifically 75.5°), also known as the 1 in 4 rule. The name’s not just for ease of remembering – it’s a quick guide to reaching that perfect angle. Simply move the ladder 1 foot away from a wall for every 4 feet of ladder height.

The reason why your ladder should be angled at 75° is that this strikes the perfect point between wall contact, floor and ladder foot contact, and weight distribution between the wall and floor to support the ladder and the person using it.

Moving your ladder closer to a wall would lessen the surface area between the wall and ladder and reduce optimal weight distribution, making it more likely to sway side to side. In contrast, moving your ladder away from a wall would minimize the point of contact between the rubber feet of your ladder and the ground. This might cause the ladder to drop, and may result in your stabilizer or leveler also slipping and giving out.

Let’s loop back around to the 1 in 4 rule. The higher your ladder, the farther away your ladder needs to be. This poses a problem on stairs, as you’re going to eventually run out of real estate if you’re painting a particularly high corner.

Unfortunately, this problem isn’t as easily addressed. The ladder stabilizing tool you use may or may not provide some leeway, but if you’re looking to maintain that steady and stable 75° angle and you’ve run out of room to use your ladder on stairs, you may need to look to alternative solutions, such as scaffolding.


Climbing Tips and Tricks

I’ll get on my soapbox about the dangers of scaffolding later. For now, we’ve a third part of the equation to consider: “get to climbing”.

I won’t lie, there’s not a whole lot to go over with this one. If you’re willing to use a ladder on a staircase, you’ve probably used a ladder elsewhere, and many of the same principles apply on stairs as they do off them.

Most importantly, don’t lean far to the side from the body of the ladder, keep in mind the 1 in 4 rule, and at the very least, wear a hard hat. If you’re keen on taking the quick way down, you can at least try to minimize the damage.

If you’re a true stickler for safety (something to be commended, applauded, and encouraged), you’ll abide by OSHA’s recommendations of ladder fall protection systems. While these recommendations are intended for fixed ladders, or ladders that are permanently built into a structure, OSHA guidelines do provide some key universal takeaways.

Though not as applicable to stairwells, if you find yourself propping your ladder to access an upper landing surface (maybe you have the ladder propped against the upper floor stair railings instead of a wall), the side rails should extend at least 3 feet above the upper landing surface. This is both to provide added stability and provide an easier means of egress.

Additionally, make sure the ladder you’re using is capable of supporting at least 4x the maximum intended load. Granted, we don’t want you testing that out yourselves; this is more of a manufacturer requirement, and something worth following up on as a consumer. The same notion applies to any ladder accessories and tools you use.

Apart from that, stick to going one rung at a time. Take it slow, take it steady, and do not invoke hubris. The moment you feel shaky, step off to safety. If you’re not acquainted with using a ladder on stairs, and if your setup doesn’t fill you with confidence, there’s no harm in working with professional contractors, either.


Whew. That was a lot of words, and a lot of reading. Still, this probably took less time than it would have taken to set up staircase scaffolding (did I mention I’m not a fan?).

Speaking of scaffolding, we’ve done a lot of talk about ladder levelers, ladder accessories, and ladder stabilizers. If you’re keen to learn more, check out our blog post about the various types of tools available to your disposal, including but not limited to the coveted ladder roof hooks.

Présentation de la poignée de porte extérieure GL : Édition or satiné

Nous sommes ravis d’annoncer le dernier ajout à notre gamme de produits – la poignée GL pour contre-porte et porte moustiquaire (également connue sous le nom de HK01-I-SG), maintenant disponible dans l’élégante finition or satiné. Cette magnifique poignée allie fonctionnalité, durabilité et esthétique, ce qui en fait le choix idéal pour les propriétaires qui souhaitent améliorer l’aspect général et la sécurité de leurs contre-portes et de leurs portes moustiquaires.

La poignée à levier GL

L’ensemble de poignée HK01-I-SG

Design épuré et qualité de fabrication supérieure

La poignée à levier GL pour contre-portes et portes moustiquaires présente un design élégant et contemporain qui ajoute une touche de sophistication à toute contre-portes ou portes moustiquaires. Construite pour résister à l’épreuve du temps, cette poignée de remplacement pour contre-porte et porte moustiquaire conservera son éclat et sa brillance malgré l’utilisation quotidienne et les éléments environnementaux. La finition or satiné s’harmonise avec un large éventail de styles architecturaux, rehaussant l’attrait visuel de l’extérieur de votre maison.

Sécurité renforcée et fonctionnement pratique

La sécurité est primordiale lorsqu’il s’agit de protéger vos proches et vos biens. L’ensemble de poignées de porte avant HK01-I-SG est doté d’un loquet intérieur non verrouillable pour garantir la fermeture de votre porte, et d’un pêne dormant à clé en finition or satiné assortie pour un niveau de sécurité supplémentaire. La poignée est également facile à utiliser, ce qui vous permet, à vous et à vos invités, d’entrer et de sortir sans effort. Plus besoin de tripoter une poignée à bouton-poussoir, il suffit d’une simple rotation de du levier, identique au fonctionnement des poignées de porte intérieures.

Installation facile et polyvalence

Grâce à nos instructions d’installation détaillées étape par étape, l’installation de l’ensemble de poignées de contre-porte GL est un jeu tout simple. Compatible avec la plupart des contre-portes et des portes moustiquaires dont l’épaisseur varie de 1 po à 2 1/8 po, l’ensemble de poignée à levier GL constitue une mise à niveau idéale pour une poignée de remplacement de contre-portes. La poignée GL est conçue pour remplacer la plupart des poignées à montage en surface avec un espacement des trous de 1 3/4 po et n’est pas compatible en tant que remplacement pour les ensembles de poignées à mortaise.

Rehaussez le style de votre maison avec la finition or satiné

Avec sa superbe finition or satiné, la poignée HK01-I-SG apporte une touche d’opulence à votre entrée. Créez une impression durable et rehaussez le style de votre maison avec cette superbe quincaillerie.

Vous cherchez d’autres finitions pour répondre à vos besoins esthétiques ? Nous avons ce qu’il vous faut. Améliorez votre contre-porte ou votre porte moustiquaire dès aujourd’hui avec la GLWV2MB – la même élégance que la poignée GL, avec les avantages supplémentaires d’un loquet intérieur verrouillable, et dans la finition emblématique noir mat. Contrairement aux poignées de porte noires brillantes, la finition noire mate est une tendance croissante qui s’associe à un large éventail de styles de portes et de ferrures. Et si vous recherchez un look complètement différent, envisagez de remplacer votre poignée de porte moustiquaire par notre poignée à levier AJ moderne dans la finition classique argent pour une fusion méticuleuse des styles.

Faites l’expérience d’un mélange parfait de fonctionnalité et d’esthétique, soutenu par un savoir-faire de qualité et une grande durabilité, avec Sécurité Idéale. Faites une déclaration avec votre poignée de porte et laissez une impression durable à tous ceux qui entrent dans votre maison.

N’oubliez pas de consulter notre catalogue complet de quincaillerie pour contre-portes pour plus d’informations !

Introducing The GL Exterior Door Handle: Satin Gold Edition

We are delighted to announce the latest addition to our product lineup – the GL storm door and screen door lever handle (also known as the HK01-I-SG), now available in the elegant Satin Gold finish. This stunning handle combines functionality, durability, and aesthetic appeal, making it the perfect choice for homeowners looking to enhance the overall look and security of their storm doors and screen doors.

The GL Lever Handle

The HK01-I-SG Handle Set

Sleek Design and Superior Craftsmanship

The GL Storm Door and Screen Door Lever Handle boasts a sleek and contemporary design that adds a touch of sophistication to any storm door or screen door. Built to withstand the test of time, this storm door and screen door replacement handle will retain its luster and sheen despite daily use and environmental elements. The Satin Gold finish complements a wide range of architectural styles, elevating the visual appeal of your home’s exterior.

Enhanced Security and Convenient Operation

Security is paramount when it comes to protecting your loved ones and property. The HK01-I-SG front door handle set features a non-locking inside latch to ensure your door is securely shut, and a keyed deadbolt in a matching Satin Gold finish for an added layer of security. The lever handle is also easy to operate, providing effortless entry and exit for you and your guests. No more fumbling with a pushbutton handle is necessary; all it takes is a simple twist of the lever, identical to the operation of interior door handles.

Easy Installation and Versatility

With our step-by-step comprehensive installation instructions, installing the GL storm door handle set is a breeze. Compatible with most storm doors and screen doors that have a thickness ranging from 1″ to 2 1/8″, the GL lever set is an ideal upgrade for a storm door replacement handle. The GL Handle is designed to replace most surface mount handles with a hole spacing of 1 3/4″ and is not compatible as a replacement for mortise handle sets.

Elevate Your Home’s Style with Satin Gold Finish

With its stunning Satin Gold finish, the HK01-I-SG handle brings a touch of opulence to your entryway. Create a lasting impression and elevate your home’s style with this stunning hardware upgrade.

Looking for other finishes to fit your desired aesthetic? We’ve got you covered. Upgrade your storm door or screen door today with the GLWV2MB – the same elegance of the GL handle, the added benefits of a locking inside latch, and in the iconic Matte Black finish. Unlike glossy black door handles, the matte black finish is a growing trend that pairs with a wide range of door styles and hardware. And if you’re looking for a different look altogether, consider replacing your screen door handle with our modern AJ lever handle in the classic Silver finish for a meticulous merging of styles.

Experience the perfect blend of functionality and aesthetics, backed by quality craftsmanship and durability, with Ideal Security. Make a statement with your door handle and leave a lasting impression on all who enter your home.

Be sure to check out our full Storm Door Hardware Catalogue for more information!

Ideal PRO veut que vous travailliez en toute sécurité dans les escaliers avec le Ladder-Aide PRO

Ideal PRO présentera le Ladder-Aide PRO au NSC Safety Congress & Expo en octobre à la Nouvelle-Orléans, au kiosque 4923.

Que vous ou votre équipe entrepreniez un projet d’entretien, de CVC ou de rénovation nécessitant l’installation d’une échelle dans un escalier, le Ladder-Aide PRO est un outil qui vous aidera à commencer le travail rapidement et à l’exécuter en toute sécurité.

Ladder-Aide PRO est un stabilisateur d’échelle qui crée une surface solide, stable et plane pour travailler dans les escaliers en toute sécurité. Grâce à sa construction entièrement en acier et à ses patins antidérapants sur sa base, Ladder-Aide PRO peut supporter 1 500 livres et répond aux normes de taille et de poids des échelles à coulisse en aluminium et en fibre de verre de type I, IA et IAA.

Conçue pour les professionnels tels que les techniciens en CVC, les électriciens, les peintres, et les techniciens d’entretien de bâtiments, la Ladder-Aide PRO est facile à transporter d’un projet à l’autre et s’assemble en 60 secondes.

Pour plus d’informations, visitez le stand #4923, visitez https://www.ladder-aide.com ou contactez-nous à info@idealinc.com.

https://congress.nsc.org/nsc2023/public/enter.aspx

Ideal PRO Wants You to Work Safely on Stairs With the Ladder-Aide PRO

Ideal PRO will be presenting the Ladder-Aide PRO at the NSC Safety Congress & Expo this October in New Orleans at Booth #4923.

Whether you or your team are undertaking a maintenance, HVAC, or renovation project that involves setting up a ladder on a staircase, the Ladder-Aide PRO is a tool that will help you start the job quickly and execute it safely.

Ladder-Aide PRO is a ladder stabilizer that creates a strong, stable, level, surface to work on stairs safely. With an all-steel construction and non-slip pads on its base, Ladder-Aide PRO can support 1500 lbs and meets the size and weight standards of Type I, IA and IAA aluminum and fiberglass extension ladders.

Designed for pros such as HVAC technicians, electricians, painters, contractors, building maintenance technicians, the Ladder-Aide PRO is easy to carry from one project to the next and takes 60 seconds to assemble.

For more information, stop by Booth #4923, visit https://www.ladder-aide.com or contact us at info@idealinc.com.

Learn more at https://congress.nsc.org/nsc2023/public/enter.aspx.

A Guide To Garage Door Extension Springs

There comes a time when hardware we take for granted needs replacing, and garage door springs are no exception. Between the wear and tear of time and constant use, garage door springs will gradually weaken and warp, resulting in an imbalanced garage door. With the right information in mind and tools in hand, what was once a complicated and potentially risky replacement process will instead be a safe and simple task.

Note: There will always be an element of risk when replacing garage door springs. Be cautious, wear protective equipment, and when in doubt, contact professionals.

Torsion Springs and Extension Springs

Before replacing your garage door springs, you should first determine the type of springs you have. These are generally split into two categories with their own subcategories, but we’ll focus on the main two – Torsion Springs, and Extension Springs.

You should be able to figure out which of the two your garage door is equipped with at a glance – Extension Springs are long, slim, and run parallel to your garage door’s horizontal tracks on either end of your garage door. In stark contrast, Torsion Springs are thick and bulkier, and are located directly above your garage door opening.

Both spring types operate by providing a counterbalance to your garage door, but the means they achieve this counterbalance is what sets them apart from one another. Extension Springs essentially “pull” your garage door open with a lift cable that runs from the spring to the bottom of the garage door. Torsion Springs rotate and either wind or unwind to close or open your garage door, respectively.

The majority of residential garage doors use extension springs, whereas torsion springs are generally used for industrial or commercial doors. However, if your home features a particularly heavy or large garage door, it may be using torsion springs.

Identifying Broken Garage Door Springs

Unlike other components of garage door hardware, it is easier to determine when a garage door spring has passed its prime.

Visually, you might notice a gap in your spring that’s wider than the usual distance between the coils. That tends to indicate a weakening spring. More telling signs often occur when it’s too late to get a bit more mileage out of a spring. Generally, those signs tend to be:

  • A garage door that fails to open
  • A garage door that slams shut
  • A crooked, imbalanced garage door
  • A rather loud bang or snap as the garage door spring finally gives out

Identifying The Right Replacement Springs

Extension springs are often color-coded to indicate the weight of garage door they can support and the length they stretch to. While a good rule of thumb is to replace your garage door extension springs with those of the same color, this method may not always be reliable. With time, your springs may lose their color, making it more difficult to properly identify them. Furthermore, not all manufacturers color-code their springs the same way.

Another way to identify your garage door springs is to measure the inner diameter of your spring. However, this method is not ideal, as spring diameter can differ due to varying manufacturing processes and spring materials.

The preferred method to determine the type of spring you need is to weigh your garage door after your old springs have been disconnected and removed. Upon removing your old springs, close your garage door on top of a scale to get an accurate reading of your garage door’s weight. Be sure to also measure the height of your garage door.

With that information in tow, you can begin searching for extension springs that support the weight and height of your garage door. Most manufacturers will readily have a spring selection guide or chart available to help you select the right extension spring for your garage door, much like our own chart below.

Installation Tips

When replacing your garage door extension springs, here are some tips to keep in mind:

  • Replace both springs to ensure your garage door remains properly balanced
  • Use this opportunity to replace old garage door hardware, such as pulleys and rollers. Your garage door uses springs, pulleys, and rollers in conjunction with each other. Making sure that these components are in good shape and are working in harmony is an essential step to ensure you have a smooth, silent garage door.
  • Make sure you are installing the correct type of springs. Note that this guide covers extension springs intended for sectional garage doors, which are not the same as torsion springs.

Installing Garage Door Springs

For a thorough guide on installing garage door springs, check out our installation video. In this instance, a visual representation will better guide you to properly install your garage door extension springs. You can also follow along with the brief overview list below:

  1. Open your garage door, and block it from closing
  2. Disengage your electric door opener
  3. Unhook the s-hooks and remove your garage door pulleys
  4. Remove the old springs and safety extension cables
  5. Pass the safety extension cable through the new spring
  6. Hook the spring to the attachment hook on the rear hanger bar
  7. Attach the safety extension cable to the slotted angle bracket nearest to the stationary pulley
  8. Attach the pulley onto the spring, and thread the extension cable onto the pulley
  9. Pull the extension cable until fully tensioned to the initial s-hook position and reattach it

With that, your garage door should be set to operate for a number of years without the need to replace its springs.

Ready to replace them? Check out Ideal Security’s Garage Door Extension Springs, tested for up to 15,000 cycles. While you’re at it, consider revamping your garage door entirely with tried and tested pulleys and rollers.

If you’re on the fence about replacing your garage door rollers, or don’t know what type of roller to select, check out this article where we dive deep on the function and types of rollers.

Ideal Security Invites You to Discover the Ladder-Aide PRO at NSC Spring Safety Conference & Expo 2023 

(Montreal, Quebec) – May 8, 2023 – Ideal Security, a leading home hardware supplier for over 65 years, will highlight its innovative safety solution for using ladders on stairs, the Ladder-Aide PRO, at the 2023 NSC Spring Safety Conference & Expo in Indianapolis. 

The event takes place from May 18th – May 19th, and product experts Liohn Sherer and Lisa Griffiths from Ideal Security will be on site at Booth 112 during Expo hours to present the Ladder-Aide PRO. 

The Ladder-Aide PRO is a portable ladder leveler designed to allow people to safely use extension ladders on stairs. With an all-steel construction, tested for up to 1500 lbs, the Ladder-Aide PRO supports Type III to Type IAA ladders and is equipped with an anti-skid base. It’s micro-adjustable to 1/8″ for use on almost any stairs, and it requires no installation into one’s stairs, taking less than a minute to assemble. 

“We are excited to showcase our latest safety innovation, the Ladder-Aide PRO, at the NSC Spring Safety Conference & Expo. Our product is particularly well-suited for businesses that require employees to work on stairs, such as electrical businesses, HVAC, and building maintenance. With its portable and compact design, high-grade steel construction, and anti-skid surface, the Ladder-Aide PRO is a practical solution that can significantly enhance the safety and productivity of these workplaces. We look forward to demonstrating how it can make a difference for attendees at the event”

Liohn Sherer, President at Ideal Security

To learn more about the Ladder-Aide PRO, attendees can visit Booth 112 at the NSC Spring Safety Conference & Expo or contact Liohn Sherer at liohn@idealinc.com or Lisa Griffiths at lisa@idealinc.com

For more information, please contact: 

Liohn Sherer, President: liohn@idealinc.com  

Lisa Griffiths, Marketing Director:  lisa@idealinc.com  

We look forward to seeing you there! 

About Ideal Security

Ideal Security is a leading hardware developer that offers a wide range of high-quality products for home and professional use. Our company has its roots in storm door manufacturing and has since expanded to include three distinct brands: Ideal Security, Ideal BNZ, and Ideal PRO. 

Based in Montreal, Quebec, and with a warehouse in Prescott, Ontario, our team of 15 dedicated professionals works tirelessly to maintain our reputation for excellence in customer service, trust, and collaboration. We are the makers of the award-winning Ladder-Aide Pro, which won multiple awards, including the NHRA Retailers’ Choice Award and the UIA Best Marketing Award. 

With our 45,000 square foot distribution center in Prescott, Ontario, we serve the entire North American market, shipping to the US daily. Ideal Security is committed to actively developing new opportunities while keeping the purpose, values, and core competencies that have sustained us for over 60 years. 

Ladder-Aide PRO: Customer Testimonials For Safe Stairway Use

Don’t Take Our Word For It

Whether you’re amping up your home security with our security bars, preparing for power outages with our emergency lights, or using our Ladder-Aide levelers and stabilizers to safely use ladders on stairs for your painting, light installation, HVAC installations, and more, Ideal Security has an unwavering commitment to helping you get the job done safely and reliably.  

Here are just a few testimonials our customers have to share about how they’ve been using the Ladder-Aide PRO to safely use ladders on stairs. 

Short and sweet. Still not convinced?

And we’ve more to offer than just words to show how safe the Ladder-Aide PRO is. Here are a few images taken by our customers of their own Ladder-Aide PRO setups on stairs!

Whether you’re in need of a ladder-on-leopard…

Or aren’t keen on slippin’ on stairs…

The Ladder-Aide PRO’s got you PRO…tected?
This is the high-quality writing you get with a degree in Literature, folks.

Professionals and DIYers alike have the Ladder-Aide PRO to thank for being able to safely use ladders on stairs. Don’t take the risk with paint cans and planks. Get your Ladder-Aide PRO today, and have a safer tomorrow.

Le Secret du Nettoyage de Printemps : les Barres de Sécurité

Le printemps arrive à grands pas, ce qui signifie qu’il est temps de tirer les rideaux, d’ouvrir les fenêtres et les portes patios ou les portes vitrées coulissantes, et de laisser entrer le soleil chaud et la brise légère pour chasser la déprime de l’hiver. Mais aussi tentant que cela puisse être d’ouvrir chaque fenêtre et chaque porte pour cette saison de nettoyage de printemps, ces quelques points pourraient vous faire repenser cette décision :

1.           L’initiative des enfants et des animaux domestiques d’explorer

Après un hiver passé enfermé et emmitouflé dans des vêtements épais, rien n’est mieux que de sentir le soleil sur la peau. Bien qu’il soit indispensable de promener vos animaux de compagnie ou de laisser vos enfants jouer dans le jardin, ces activités peuvent être reléguées au second plan sur votre liste de priorités pendant que vous nettoyez les gouttières, et que vous remplacez vos vestes et manteaux par des chemises et des robes et votre literie d’hiver par des draps plus légers.

Mais pour vos animaux de compagnie et vos enfants, un peu de plaisir au soleil est une priorité, et une porte patio ouverte est une invitation à sortir sans surveillance et à se mettre en danger.

2.           L’intrusion de personnes non invitées dans votre maison

Si votre attention est partagée entre la surveillance de votre famille et le désencombrement de votre maison, ou si vous avez laissé une fenêtre entrouverte pour laisser la brise tempérer les nuits étouffantes de chaleur, un intrus pourrait se charger de vous aider à vous débarrasser de certains de vos biens – pour de bon.

Vous pensez peut-être que ce dilemme a une solution binaire – soit vous laissez vos fenêtres et portes patios coulissantes ouvertes et vous prenez un risque, soit vous les gardez fermées et vous faites du nettoyage de printemps une corvée poussiéreuse et exiguë – mais si je vous proposais une troisième option qui vous donne le meilleur des deux mondes ? Un moyen d’assurer la sécurité de vos proches tout en invitant la sensation du printemps dans votre maison ?

Voici les barres de sécurité pour portes patios et fenêtres de Ideal Security

Disponibles en trois tailles différentes, nos barres de sécurité 110, 111 et 112 visent à résoudre de multiples problèmes avec une seule solution simple. Voici quelques exemples de ce que vous pouvez faire avec les barres de sécurité :

  • Dissuasion des intrus : Éloigner les intrus avec une couche supplémentaire de sécurité solide ; Ces barres de sécurité se verrouillent en place et sont percées dans le cadre, contrairement aux barres montées sous pression qui peuvent être ébranlées
  • Verrouillage progressif : Ouvrez vos fenêtres et portes patios aussi largement que vous le souhaitez pour laisser entrer la brise printanière, mais avec une ouverture trop étroite pour laisser sortir les enfants et les animaux domestiques ; La barre peut se verrouiller par incréments pour empêcher la porte ou la fenêtre de s’ouvrir plus largement
  • Aide à l’installation à domicile : Gardez vos fenêtres et portes patios bien stables lors de l’installation de climatiseurs de fenêtre ou de portes pour animaux de compagnie
  • Et bien plus encore !

Chaque barre de sécurité est équipée d’une serrure anti-soulèvement pour plus de sécurité et de protection des enfants. La barre de sécurité 110 est également équipée d’un support rotatif, qui vous permet de ranger la barre vers le haut et sur le côté lorsqu’elle n’est pas utilisée. En fonction de la taille de votre fenêtre ou de votre porte patio, vous devriez opter pour :

  • Le modèle 110, d’une longueur minimale de 25,7 po et d’une extension maximale de 47,5 po
  • Le modèle 111, d’une longueur minimale de 15,7 po et d’une extension maximale de 26,75 po
  • Le modèle 112, notre plus petite barre de sécurité allant de 10,6 po à 16,6 po

Une fois que vous aurez choisi la bonne taille et installé la barre de sécurité, vous disposerez d’une serrure de fenêtre ou de porte vitrée coulissante efficace.

Ce printemps, il n’est pas nécessaire de faire des compromis en matière de sécurité. Profitez du confort de la sécurité grâce aux barres de sécurité pour vos fenêtres et portes patios coulissantes.