Qu’est-ce qu’une vis sectionnable ?

Les vis à rupture, ou vis à casser, offrent une solution pratique pour éviter le gaspillage de vis standard. Elles fournissent exactement le nombre nécessaire, réduisant le gaspillage et offrant une certaine flexibilité. De plus, une méthode est décrite pour les ajuster à la longueur souhaitée. Ces vis sont désormais incluses dans certains produits de quincaillerie pour contre-portes.

Les vis à rupture, également connues sous le nom de vis sectionnable ou vis à casser, sont des vis plus longues qui présentent des points de coupe à différents incréments d’un quart de pouce sur la longueur de la vis.

Contrairement aux paquets de vis standard qui sont livrés avec la quincaillerie ou achetés séparément, les vis à rupture de pont offrent à la fois une polyvalence et une agence pour l’utilisation des vis. Elles constituent en outre une option écologique. Poursuivez votre lecture pour en savoir plus sur les vis à rupture brusque et sur quelques méthodes pour les couper à la longueur souhaitée.

Les avantages des vis de rupture

Lorsque vous achetez de la quincaillerie de remplacement pour votre maison, comme des pênes dormants et des poignées pour une porte moustiquaire, vous recevez souvent un paquet de vis avec de nombreuses vis destinées à différentes épaisseurs de porte. Il faut alors trier, mesurer et éventuellement perdre des vis, pour n’en garder que deux dont on a réellement besoin, le reste étant laissé à l’abandon ou gaspillé.

Les vis à rupture de pont résolvent ce problème en fournissant exactement le nombre dont vous avez besoin, généralement 2 pour les poignées de porte et les pênes dormants. Pour réduire l’encombrement inutile et faciliter la recherche et l’utilisation des bonnes vis pour les bons produits, une partie de la gamme de produits de quincaillerie pour contre-portes d’Ideal Security (listée ci-dessous) comprend désormais 2 vis à rupture de 3 po.

Les vis à rupture offrent également une certaine flexibilité ; vous pouvez ajuster leur longueur à vos besoins. Si vous préférez utiliser les vis de votre quincaillerie de contre-porte existant, ces vis réglables peuvent être facilement réutilisées pour d’autres projets. Il suffit de couper la longueur excédentaire selon les besoins.

Comment couper les vis de rupture

Avec les bons outils et une bonne prise en main, vous pouvez couper les vis à tête cassante à la longueur souhaitée. Regardez notre guide vidéo étape par étape pour apprendre à casser vos vis de rupture, et suivez les instructions ci-dessous.

Pour découper une vis de rupture, il suffit de :

  • 1 à 2 pinces (ou un outil de serrage similaire)
  • 1 mètre ruban ou règle
  • 1 gabarit de vis Ideal Security pour le matériel à installer

  1. Tout d’abord, mesurez l’épaisseur de votre contre-porte, de la surface extérieure (où est installée la poignée ou la serrure à pêne dormant) à la surface intérieure (où est installée la serrure intérieure ou la serrure à pêne dormant).
  2. Une fois que vous avez mesuré l’épaisseur de votre porte, se référer au gabarit de vissage fourni avec la quincaillerie de votre contre-porte Ideal Security – l’épaisseur de votre porte sera associée à la longueur de vis que vous devez couper.
  3. Après avoir identifié l’encoche de la vis qui doit être coupée, prédécoupez votre vis. Pour ce faire, serrez la pince sur l’encoche, tournez la vis d’un quart de pouce, serrez à nouveau et répétez l’opération 4 à 8 fois. Une deuxième pince peut être utilisée pour maintenir la vis en place.
  4. Saisissez l’encoche prédécoupée avec la pointe de votre pince et appliquez un léger mouvement de haut en bas pour casser l’encoche de votre vis de rupture. Si la vis a été correctement prédécoupée, l’encoche devrait se détacher sans qu’il soit nécessaire d’exercer une force excessive.

Poignées et pênes dormants pour contre-portes – Désormais avec vis de rupture

Dans le but de promouvoir le respect de l’environnement et de réduire les déchets, nous avons commencé à introduire des vis sécables dans certaines de nos gammes de produits, dont le lancement est prévu entre janvier et juin 2024. La gamme de produits comprend :

La série de serrures à clé pour contre-portes 703

La poignée tirante pour contre-portes VP

La poignée tirante pour contre-portes CS

La poignée de tirage 4390 pour contre-portes et la série de barres tactiles intérieures

La série de poignées de tirage pour contre-portes LSDXCR2267

La série de poignées de tirage pour contre-porte DX

La série de levier pour contre-portes EL

Vous avez des questions ou des préoccupations ? N’hésitez pas à nous contacter ! Vous pouvez nous contacter ici ou visitez notre gamme complète de produits de remplacement de quincaillerie de contre-porte.

What Are Breakaway Screws?

Breakaway screws, also known as snap off screws or scored screws, are longer screws that feature cutting points at various quarter-inch increments along the screw’s length.

Unlike standard screw packs that either come with hardware or are purchased separately, breakaway screws offer both versatility and agency for screw usage. They’re an eco-friendly option, to boot. Read on to learn about snap-off screws and a few methods to cut them to your preferred length.

The Benefits of Break Away Screws

When you buy replacement storm door hardware for your home, such as deadbolts and handle sets for a screen door or storm door, you often get a screw pack with many screws meant for different door thicknesses. This means sorting, measuring, and possibly losing screws, leaving you with only two you actually need, while the rest are left as clutter or waste.

Snap-off screws solve this problem by providing exactly the number you need, typically 2 for storm door handles and deadbolts. To reduce unnecessary clutter and make finding and using the right screws for the right products easier, some of Ideal Security’s storm door hardware (listed below) now includes two 3″ breakaway screws.

Breakaway screws also offer flexibility; you can adjust their length to your needs, avoiding the hassle of modifying your hardware to fit the screws we provide. If you prefer to use your existing storm door hardware’s screws, these adjustable screws can be repurposed for other projects with ease. Just snip off the excess length as required.

How To Cut Breakaway Screws

With the right tools and a good grip, you can cut breakaway screws to your desired length. Watch our step-by-step video guide to learn how to break a breakaway screw, and follow along with the instructions below.

To cut a break-away screw, all you need is:

  • 1 to 2 pliers (or a similar clamping tool)
  • 1 measuring tape or ruler
  • 1 Ideal Security screw template for the hardware being installed
  1. First, measure the thickness of your storm door, from the outer surface (where the storm door handle or deadbolt lock is installed) to the inner surface (where the inside latch or storm door deadbolt thumb turn is installed).
  2. Once you’ve measured your storm door thickness, refer to the screw template included with your Ideal Security storm door hardware – your door thickness will be paired up with the screw length you need to cut at.
  3. After you’ve identified the notch on the screw that needs to be cut, pre-cut your screw. This can be done by squeezing the pliers on the notch, rotating the screw a quarter inch, squeezing again, and repeating 4-8 times. A second plier can be used to hold the screw in place.
  4. Grab the pre-cut notch with the tip of your pliers, and apply a gentle up-and-down motion to snap off the notch of your break-away screw. If the screw was properly pre-cut, the notch should snap off without the need for excessive force.

Storm Door Handles and Deadbolts – Now With Breakaway Screws

With a push to promote eco-friendliness and reduce waste, we’ve now begun introducing breakaway screws with some of our product lineup, slated to roll out between January and June of 2024. The Ideal Security storm door replacement hardware lineup includes:

The 703 Keyed Storm Door Lock Series

The VP Pull Storm Door Handle Series

The CS Pull Storm Door Handle Series

The 4390 Pull Storm Door Handle and Inside Touch Bar Series

The LSDXCR2267 Pull Storm Door Handle Series

The DX Pull Storm Door Handle Series

The EL15 Lever Screen Door Handle Series

Have any questions or concerns? Don’t hesitate to get in touch! You can contact us or visit our full line of storm door replacement hardware products online.

How Do I Use A Ladder On Stairs?

Using a ladder on stairs isn’t as easy as it sounds, but with the right preparation and tools, you’ll be ready to climb like a pro. Read on to learn the essential tips and tricks to use a ladder on stairs.

You’ve got a ladder, you’ve got a staircase, and you’ve got a high spot to reach. Maybe you’re planning on using that ladder for painting on stairs, hanging up a portrait, or doing some HVAC work on stairs. But the fact of the matter is, using a ladder on stairs is no easy feat. At least, not at first glance.

Read on, and we’ll walk you through key elements to consider and answer how to put a ladder on stairs.

Haven’t picked out the right ladder to use on stairs yet? Check out our previous blog post, where we go over popular styles of ladders for stairways and discuss what ladder duty ratings actually mean.


It may seem like there’s a straightforward solution to using ladders on stairs. Prop it on a box, lean it against a wall, and get to climbing, right?

Not exactly. Let’s work our way through each step of the above sentence and point out the errors, beginning with the box.


A Stable Surface

While single ladders, extension ladders, and (in certain configurations) combination ladders are of the few ladders that are not bound by regulation against the use of stabilizers and levelers to create a level surface for your ladder, the quality of the surface matters.

For starters, the leveling tool can’t be as unstable as a standalone box, barrel, or crate – ladder accessories must be mounted directly on your ladder to ensure stability. Other leveling tools that don’t fall under the umbrella of “accessory” don’t necessarily need to be mounted to a ladder, but they should come with their own self-supporting capabilities that can withstand slip tests.

Only, it’s not just a matter of stability. Gluing a plastic box to the feet of your ladder won’t exactly cut it. You need to ensure that the accessory or tool you’re using can:

  • Support the weight of the ladder
  • Support the weight of the person using the ladder
  • Support the weight of the equipment used by said person on the ladder
  • Support the weight of tools being carried, stored, and used by the equipment-laden person on the ladder

Otherwise, the stability and levelness of your leveling tool is a moot point if your ladder breaks right through it. Your leveling tool or accessory should be capable of supporting at least 4x the duty rating of your ladder and preferably be made of steel.

If you’re looking for a ladder leveler for stairs, then look no further than the Ladder-Aide PRO. This all-steel ladder tool can support up to 1500lbs, is micro-adjustable to 1/8″ increments, and is built to accommodate North American stair standards.


The 1 In 4

So if you’ve got a stabilizing tool for your ladder that is both stable and capable of supporting the weight of you and your ladder, we’re now ready to address the next error of that initial sentence: “lean it against a wall”.

Although the heart of that line’s in the right place (you absolutely should lean your ladder against a wall or flat, stable surface), there’s a bit more to math out. Specifically, you need to consider the angle of your ladder placement, the height of your ladder, and the width and step height of the stairs you’re working on.

The acceptable angle for a ladder to be at, relative to the surface it’s placed against, is 75° (specifically 75.5°), also known as the 1 in 4 rule. The name’s not just for ease of remembering – it’s a quick guide to reaching that perfect angle. Simply move the ladder 1 foot away from a wall for every 4 feet of ladder height.

The reason why your ladder should be angled at 75° is that this strikes the perfect point between wall contact, floor and ladder foot contact, and weight distribution between the wall and floor to support the ladder and the person using it.

Moving your ladder closer to a wall would lessen the surface area between the wall and ladder and reduce optimal weight distribution, making it more likely to sway side to side. In contrast, moving your ladder away from a wall would minimize the point of contact between the rubber feet of your ladder and the ground. This might cause the ladder to drop, and may result in your stabilizer or leveler also slipping and giving out.

Let’s loop back around to the 1 in 4 rule. The higher your ladder, the farther away your ladder needs to be. This poses a problem on stairs, as you’re going to eventually run out of real estate if you’re painting a particularly high corner.

Unfortunately, this problem isn’t as easily addressed. The ladder stabilizing tool you use may or may not provide some leeway, but if you’re looking to maintain that steady and stable 75° angle and you’ve run out of room to use your ladder on stairs, you may need to look to alternative solutions, such as scaffolding.


Climbing Tips and Tricks

I’ll get on my soapbox about the dangers of scaffolding later. For now, we’ve a third part of the equation to consider: “get to climbing”.

I won’t lie, there’s not a whole lot to go over with this one. If you’re willing to use a ladder on a staircase, you’ve probably used a ladder elsewhere, and many of the same principles apply on stairs as they do off them.

Most importantly, don’t lean far to the side from the body of the ladder, keep in mind the 1 in 4 rule, and at the very least, wear a hard hat. If you’re keen on taking the quick way down, you can at least try to minimize the damage.

If you’re a true stickler for safety (something to be commended, applauded, and encouraged), you’ll abide by OSHA’s recommendations of ladder fall protection systems. While these recommendations are intended for fixed ladders, or ladders that are permanently built into a structure, OSHA guidelines do provide some key universal takeaways.

Though not as applicable to stairwells, if you find yourself propping your ladder to access an upper landing surface (maybe you have the ladder propped against the upper floor stair railings instead of a wall), the side rails should extend at least 3 feet above the upper landing surface. This is both to provide added stability and provide an easier means of egress.

Additionally, make sure the ladder you’re using is capable of supporting at least 4x the maximum intended load. Granted, we don’t want you testing that out yourselves; this is more of a manufacturer requirement, and something worth following up on as a consumer. The same notion applies to any ladder accessories and tools you use.

Apart from that, stick to going one rung at a time. Take it slow, take it steady, and do not invoke hubris. The moment you feel shaky, step off to safety. If you’re not acquainted with using a ladder on stairs, and if your setup doesn’t fill you with confidence, there’s no harm in working with professional contractors, either.


Whew. That was a lot of words, and a lot of reading. Still, this probably took less time than it would have taken to set up staircase scaffolding (did I mention I’m not a fan?).

Speaking of scaffolding, we’ve done a lot of talk about ladder levelers, ladder accessories, and ladder stabilizers. If you’re keen to learn more, check out our blog post about the various types of tools available to your disposal, including but not limited to the coveted ladder roof hooks.

What Type of Ladder Can I Use on Stairs?

Curious about the types of ladders that are safe to use on stairs? We’ve got you covered. Check out this post to learn about ladder types and the various tips and tricks to keep in mind when using a ladder on stairs.

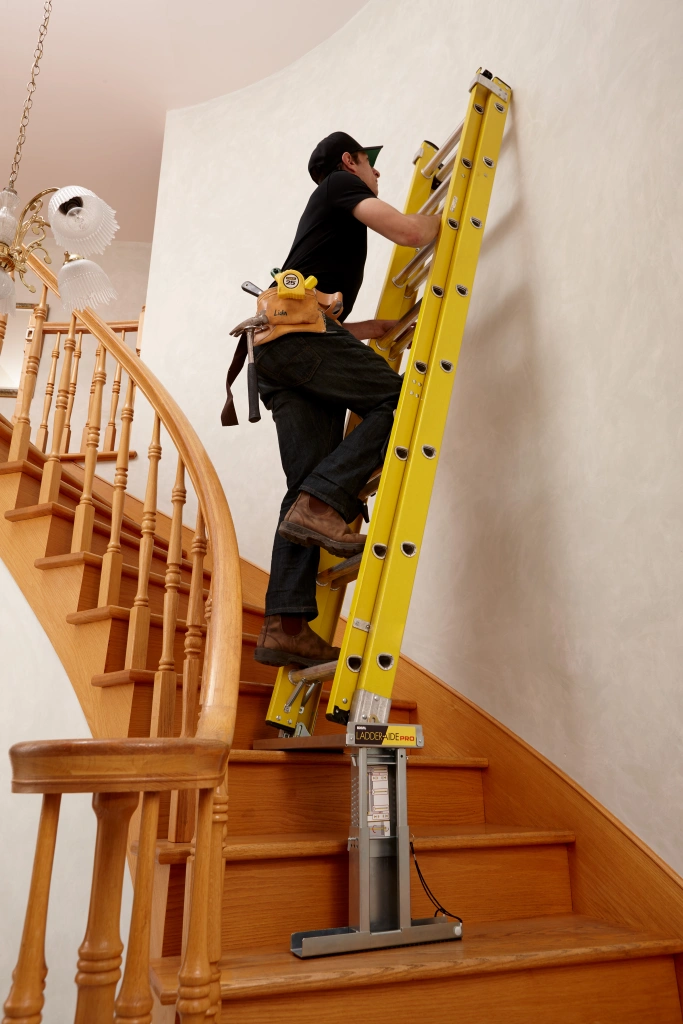
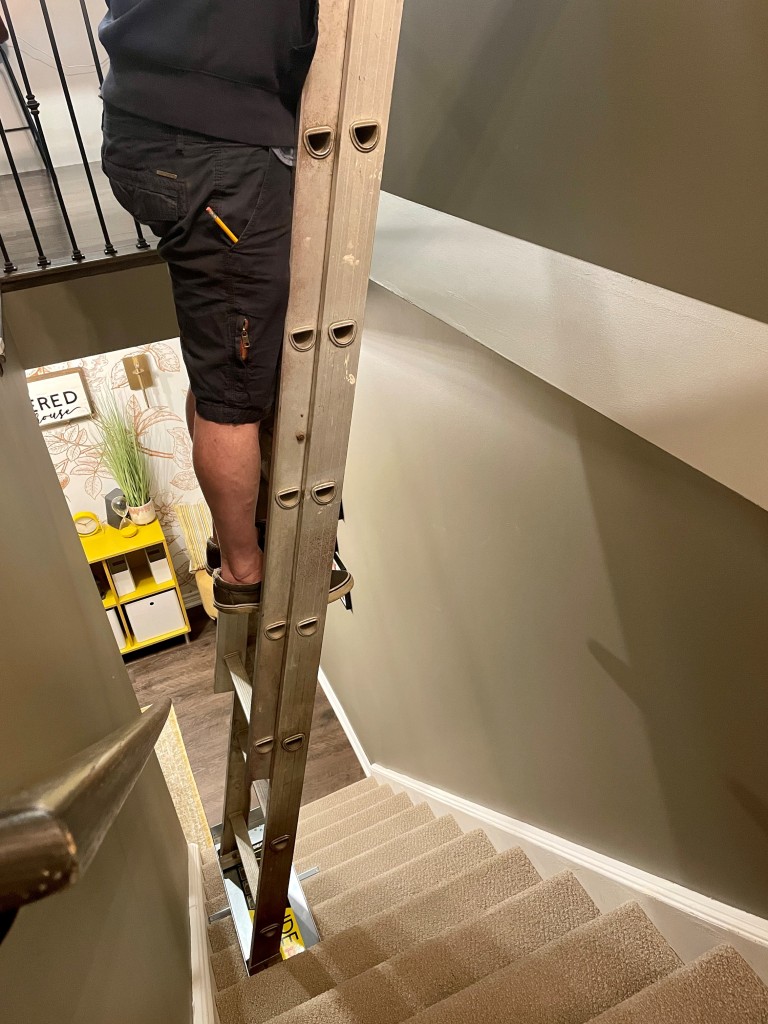
Sometimes, you’ll find a spot above the stairs that you just can’t quite reach. Maybe it’s to repaint one off-color corner, hang up a painting, or perform HVAC work. In times like these, the only solution is to use a ladder on stairs.

Read on, and we’ll walk you through the best types of ladders to use on stairs and a quick breakdown of ladder types.

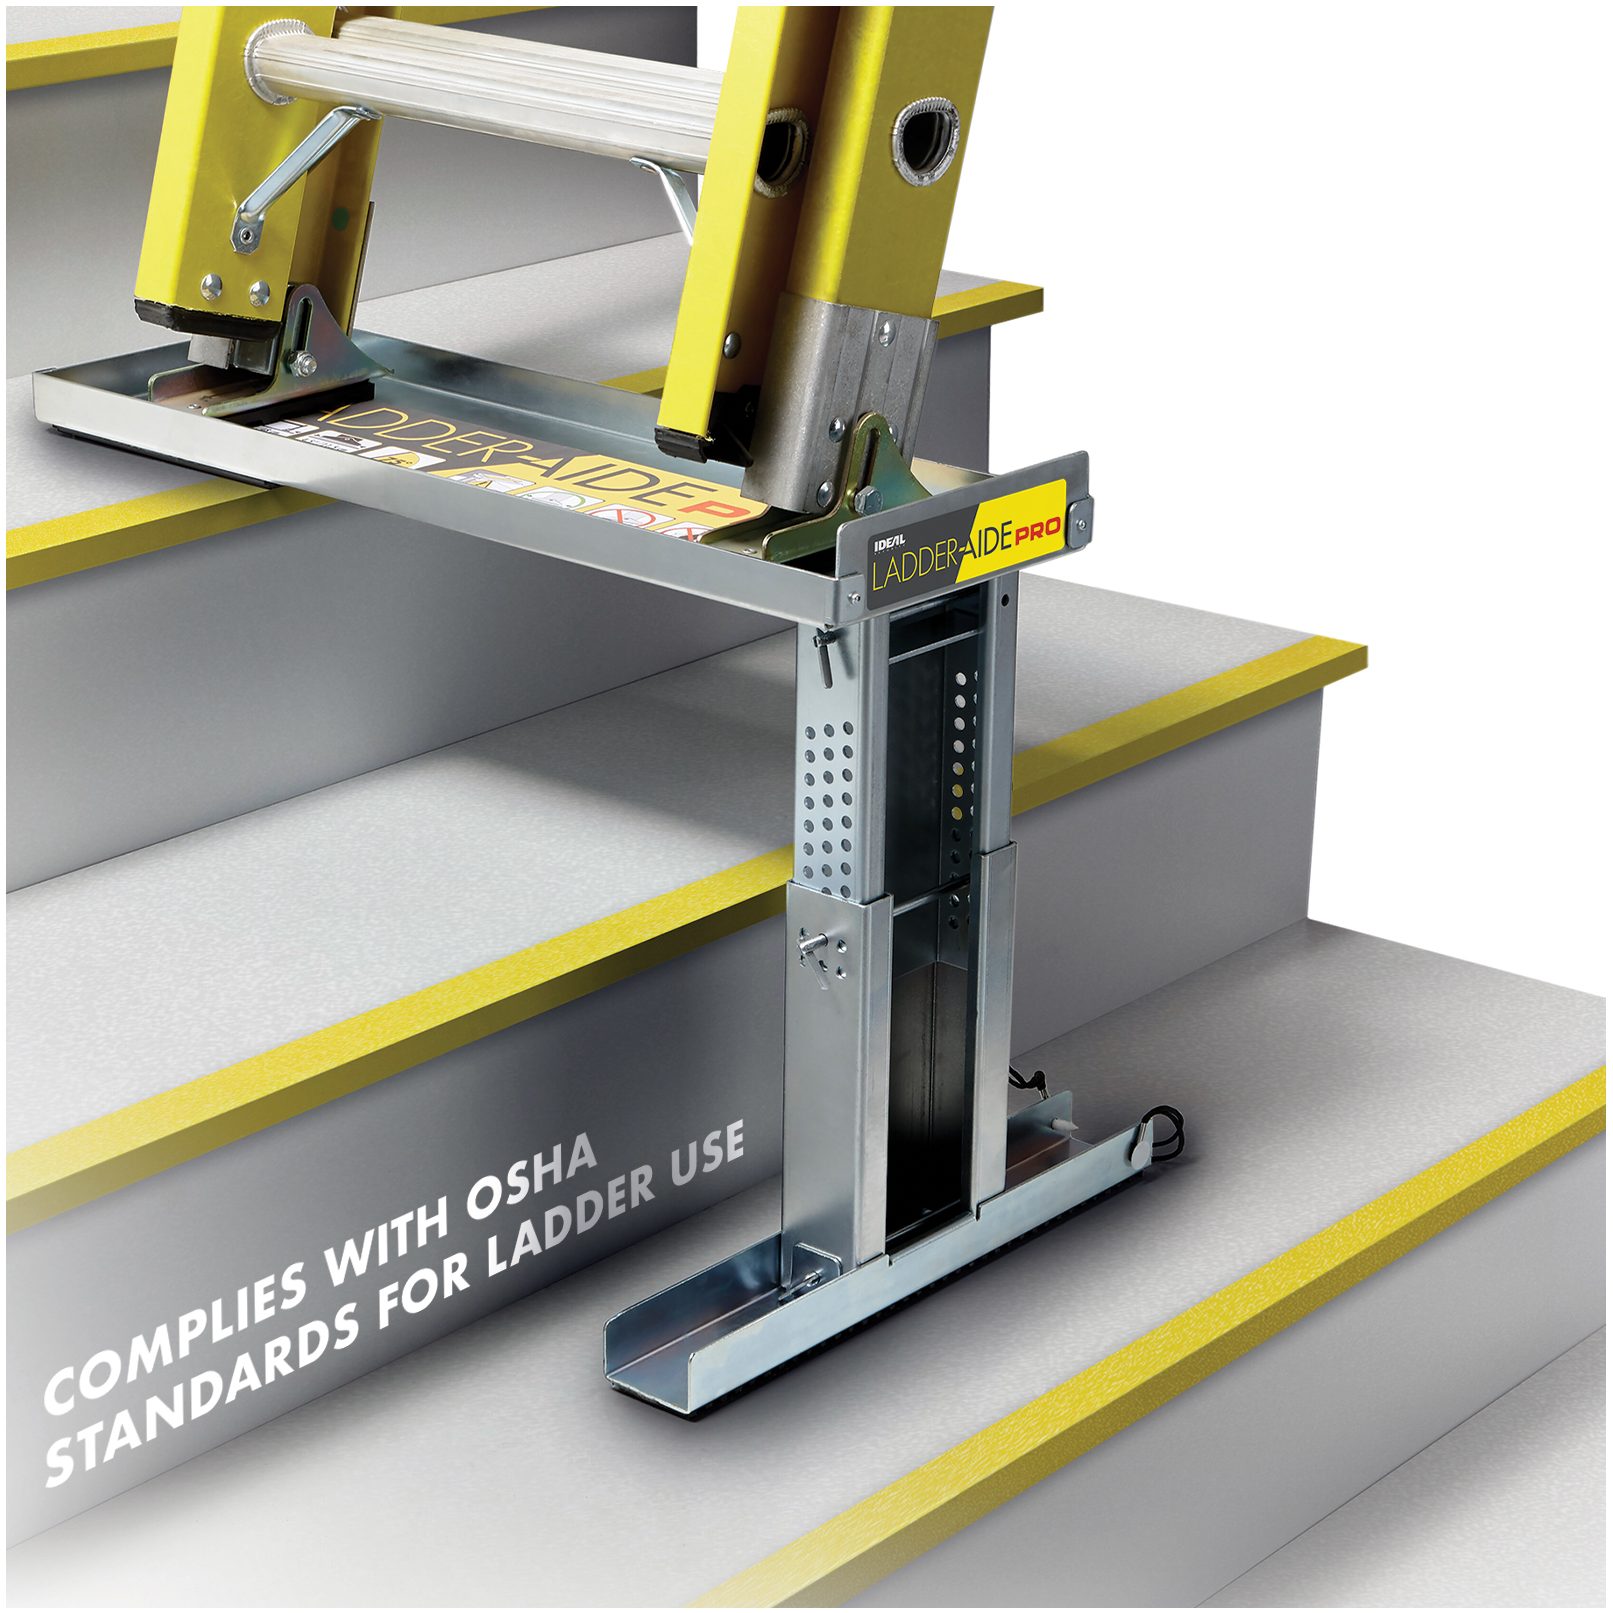
When you’re done, come on back and learn how you can use a ladder on staircases without relying on bulky, time-consuming, and potentially risky staircase scaffolding.

The Safest Ladders to Use on Stairs

First and foremost: do not use single-rail ladders. According to OSHA (1926.1053(b)(21)), that is a hard and fast rule, regardless of whether or not you plan to use a ladder on stairs.

With that out of the way, there are a surprising number of ladders that can be used on stairs. From combination ladders to extension ladders, most types of ladders can be used on stairs conditionally. Some ladders have integrated mechanisms that allow the adjustment of individual legs to provide level heights for staircase use, while others require the use of accessories and ladder stabilizers. Even ladders that are exclusively made to be used on stairs come with some conditions and caveats, so be sure to thoroughly review any documentation that comes with your ladder to determine the ideal usage conditions.

Below, we’ll go over the general ladder types that can be used on stairs to help you make informed purchasing and ladder-use decisions. If there’s a ladder type missing from this list that you think works well on stairs, let us know!


Single Ladders

Tried, tested, and true, single ladders come with no flourishes or frills. Requiring no additional tools for general use, relying steadily on their anti-slip feet and the support of the surface it’s placed against, single ladders come in various heights ranging from 10 feet to over 30 feet. Note that single ladder height is not adjustable. Be sure to check the required height needed for your project before purchasing a ladder.

While ladder height was commonly used as an indicator of weight capacity (the taller the ladder, the more weight it could support), that is not a reliable metric nowadays. Some single ladders as short as 10 feet are capable of supporting up to 300lbs.

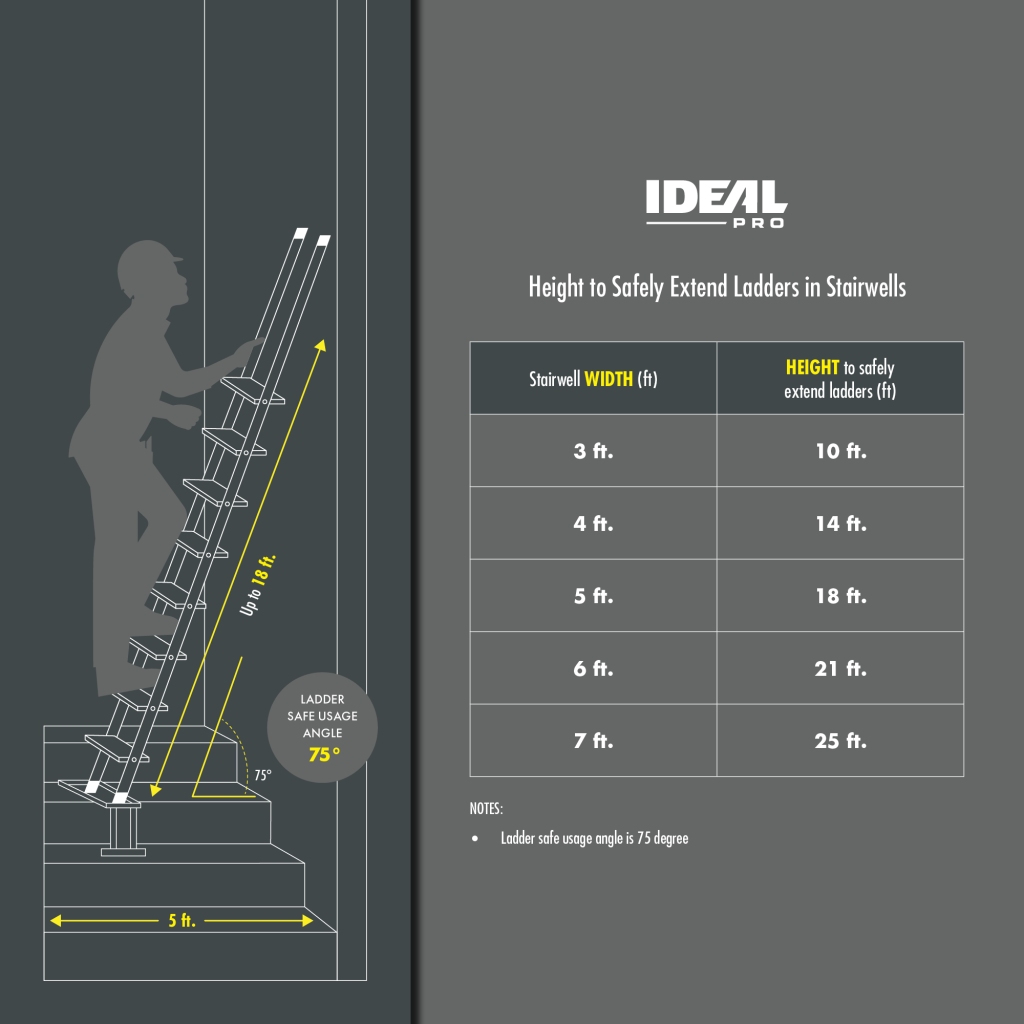
Note that you’re not necessarily better off by buying the tallest ladder available! As noted by the American Ladder Institute, using a 14-foot ladder makes working on the surface of a wall around the 10-foot mark problematic, due to the 1 in 4 rule. Click here to learn about the 1 in 4 rule, which determines the amount of space needed to safely use a ladder depending on its height.

Accessories / Tools needed to use on stairs: Yes.


Extension Ladders

Exactly as the name implies, extension ladders… extend. That may not sound particularly exciting at first, but extension ladders offer a great deal of versatility that you’d otherwise miss out on with a single ladder.

Coming in with two to three adjustable telescopic sections, extension ladders can reach heights up to 40 feet, if not higher. Unlike their limited single ladder counterparts, extension ladders are generally not restrained to their maximum height, but can rather be incrementally adjusted and held in place with rung locks. Some extension ladders come equipped with a rope and pulley system to help set the telescopic sections in place.

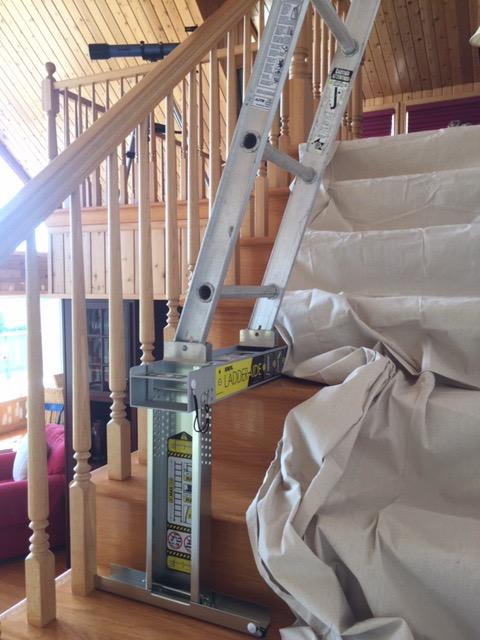
To use an extension ladder on stairs, you’ll need to employ the use of ladder accessories and leveling tools. Like single ladders, extension ladders meet regulations for the use of levelers and stabilizers to balance out uneven surfaces, making them viable candidates for use on stairwells and sloped surfaces. With the right ladder accessory or ladder leveler, you’ll have a suitable adjustable ladder for stairs in no time.

Note that this adjustable height doesn’t necessarily free extension ladders from the 1 in 4 rule, and extension ladders are not a “one-size-fits-all” tool. If you are using an extension ladder like the aforementioned 40-footer, that means the base, unextended ladder is going to be at least 20 feet tall; trying to reach the surface of a wall at or below the 16-foot mark will be a risky endeavor.

Accessories / Tools needed to use on stairs: Yes.


Combination Ladders

Bringing in the best of both worlds, combination ladders can act as stepladders, extension ladders, or single ladders, making them a unique and essential tool on a job site with various ladder requirements.

While the stepladder aspect of a combination tool cannot be used on stairs, the single ladder and extension ladder configurations can be used as described in the two previous sections. Be sure to check the manual and guidelines that come with your combination ladder for specific use case requirements.

To facilitate the single-step-extension ladder combo, combination ladders generally operate with a series of locking joints. When using your ladder in any one of the three configurations, ensure that all necessary joints are properly locked in place – the last thing you want is for your stepladder to suddenly turn into a single ladder while in use.

Accessories / Tools needed to use on stairs: Yes.


Articulating Ladders

Articulating ladders, also known as multi-position ladders or multi-purpose ladders, break the mold when it comes to ladders. Best described as a jack of all trades, articulating ladders, through a series of moving hinges, can transform into single ladders, extension ladders, stepladders, stair ladders, and potentially more. Some articulating ladders feature independently adjustable legs, meaning you may even be able to configure them to step ladders for stairs.

Discussing articulating ladders can be a bit challenging, as every manufacturer may aim for something different with their own ladders. Some multi-purpose ladders may be able to transform into ladders for stairways out the box, while others may still require the use of ladder levelers and stabilizers. Be sure to follow the manufacturer’s guidelines for ladder usage, and avoid MacGyvering your ladder to adapt to situations it’s not intended for.

The same rules apply nonetheless; one size does not fit all, mind the 1 in 4, make sure the feet are properly grounded, and ensure all hinges are properly locked. Additionally, with the number of hinges and varied use cases of a multi-position ladder, take extra care in checking your ladder for defects from wear and tear.

For more safety tips on using articulating ladders, be sure to check out the American National Standards Institute’s blog.

Accessories / Tools needed to use on stairs: Sometimes.


And more…

Undoubtedly, there are some specialty ladders for stairs, or interesting combinations of ingenuity and stubbornness to get the job done. However, official safety regulation tends to dissuade against these homemade remedies, and we’re inclined to agree with the folks over at OSHA and ANSI.

It’s no exaggeration to say that using a ladder can be dangerous in certain circumstances, and doubly so can be said if you’re using a ladder on stairs. It can be done, and there are safety measures in place to do so properly. It’s just a matter of actually following those regulations, doing some research, and investing in the right tools for your safety.

What Are Ladder Types?

Now that we’ve gone over the best ladders to use on stairs, we’ll quickly touch on ladder types, or ladder duty ratings.

There are five accepted and commonly used ladder duty ratings to familiarize yourself with. They are, from least weight capacity to most weight capacity:

  • Type III
  • Type II
  • Type I
  • Type IA
  • Type IAA

Ladder duty ratings indicate the weight that a ladder is capable of supporting. This includes the weight of the person using the ladder, the weight of the tools in use, and the weight of the equipment being worn. For the safest ladder usage, these combined weights should be less than your ladder’s maximum weight capacity.

In addition to determining the correct ladder height for a job, you should consider the application of the job, the site, and the working load you’ll be putting your ladder through. For example, Type III ladders are generally best regarded for household applications and simple tasks.

It doesn’t stop there. If you’re using ladder accessories and leveling tools, you must also consider their weight capacities, taking into account the weight of the ladder itself atop the previously mentioned factors. Optimally, you should aim to use tools that can support up to 4x the weight capacity of your ladder.


Interested to learn more? We’ve got you covered. Check out this blog post to learn about the various types of ladder accessories and tools at your disposal to use ladders on uneven surfaces, roofs, and stairs.

New Emergency Battery Operated Lights for Home Power Outages 

In a world vulnerable to power outages, the 636V2 stands out as a dependable LED emergency light that comes on when the power goes out. You can use it as a reliable fixed light source during power outages and as a portable light source. With the 636V2, you can count on keeping your surroundings brightly lit.

home emergency lights, led emergency light

Charging and Long-Lasting Battery Life

With an impressive continuous run time of 48 hours in Low Power mode and 21.5 hours in Full Power mode, the 636V2 rechargeable home emergency light ensures that you’ll never be left in the dark when you need it most. Whether it’s a power outage, a camping adventure, or an emergency, this exceptional rechargeable light for homes has got you covered. 

This rechargeable safety light offers convenience and simplicity, as it does not require any fixed installation or complex wiring. Included in the package is a USB Type-C charging cable, three rechargeable Li-ion batteries that come pre-installed, and a USB wall charger. For recharging, you just need to link the light to the wall charger using the USB Type-C cable and plug the charger into any standard AC outlet. To fully charge the emergency backup light, it should be plugged in for 24 hours. 

plug in emergency light, emergency lights for home power failure

Adjustable Light Modes

Boasting an output range of 80 and 140 lumens, the 636V2 offers a radiant glow that effortlessly lights up your surroundings, providing a bright curtain of safety to help you find your way in the dark. This light source has two light intensity modes, Low Power and Full Power, that allow you to adjust the brightness to suit your needs. 

battery powered indoor lights, led light powered by battery

The 636V2 brings unparalleled convenience to your fingertips with three adjustable function modes.

The “Night Light” mode is perfect for those who prefer a soft, ambient glow during the night. Whether you need a guiding light in the hallway or a subtle light in the bedroom, when set to this mode, the 636V2 will automatically turn on in the dark and turn off in bright conditions.  

battery powered lights, power outage night light

When your unit is plugged into an outlet and set to “Emergency” mode, it will automatically turn on in the event of a power outage. The light will also turn on if manually unplugged from a powered outlet while in this mode, transforming it into a portable power failure flashlight. The compact design and lightweight construction of this unit make it easy to carry around, allowing you to navigate through your house without any fear of running into obstacles, and providing you with a sense of security and safety.  

The “Auto” mode provides the best of both worlds, enabling the 636V2 to retain both its “Night Light” and “Emergency” functionality depending on the situation.

Versatile Power Outage Emergency Lights

With its rotatable and tiltable swivel LED lamp heads, the 636V2 offers a versatile lighting solution that allows you to shine light in two different directions simultaneously.

For a wall mounted LED emergency light, the keyhole slots on the back of the unit also allow it to be mounted on a wall to let you light precarious spots with uneven surfaces, such as staircases, to ensure optimal visibility during emergencies.

The 636V2 plug in LED light is a versatile and user-friendly indoor emergency light that offers the best of both worlds. Whether you need a gentle night light or a powerful flashlight during power outages, this battery-operated emergency light for homes has got you covered. With its adjustable swivel heads, easy-to-use controls, and intelligent “Auto” mode, the 636V2 is the perfect lighting solution for any home. 

Experience true peace of mind with the 636V2 that provides backup lighting during power outages. Say farewell to darkness and embrace the brilliance of technology and utility. Illuminate your way with Ideal Security’s 636V2 Rechargeable Emergency Lighting fixture.

emergency plug in flashlight, emergency blackout light

Nouvelle lumière d’urgence rechargeable à batterie pour les pannes d’électricité à domicile

Dans un monde vulnérable aux coupures de courant, la 636V2 se distingue comme une lumière d’urgence à DEL fiable qui s’allume en cas de coupure de courant. Vous pouvez l’utiliser comme source d’éclairage fixe fiable pendant les coupures de courant et comme source d’éclairage portable. Avec le 636V2, vous pouvez compter sur un éclairage lumineux de votre environnement.

home emergency lights, led emergency light

Chargement et autonomie de la batterie

Avec une impressionnante autonomie de 48 heures en mode basse consommation et de 21,5 heures en mode pleine consommation, la lumière d’urgence rechargeable pour la maison 636V2 vous garantit que vous ne serez jamais laissé dans l’obscurité lorsque vous en avez le plus besoin. Qu’il s’agisse d’une panne de courant, d’une aventure en camping ou d’une situation d’urgence, cette lampe rechargeable exceptionnelle pour la maison vous couvre.

Cette lampe de sécurité rechargeable offre commodité et simplicité, car elle ne nécessite pas d’installation fixe ni de câblage complexe. L’emballage comprend un câble de recharge USB Type-C, trois batteries Li-ion rechargeables préinstallées et un chargeur mural USB. Pour la recharge, il suffit de relier la lumière au chargeur mural à l’aide du câble USB Type-C et de brancher le chargeur sur n’importe quelle prise secteur standard. Pour charger complètement la lampe de secours, il faut la brancher pendant 24 heures.

plug in emergency light, emergency lights for home power failure

Modes d’éclairage réglables

Avec une gamme de puissance de 80 et 140 lumens, la 636V2 offre une lueur rayonnante qui éclaire sans effort votre environnement et constitue un rideau lumineux de sécurité pour vous aider à trouver votre chemin dans l’obscurité. Cette source lumineuse dispose de deux modes d’intensité lumineuse, faile consommation et pleine puissance, qui vous permettent de régler la luminosité en fonction de vos besoins.

battery powered indoor lights, led light powered by battery

Le 636V2 apporte une commodité inégalée au bout de vos doigts grâce à trois modes de fonctionnement réglables.

Le mode Veilleuse est parfait pour ceux qui préfèrent une lumière douce et ambiante pendant la nuit. Que vous ayez besoin d’une lumière d’orientation dans le couloir ou d’une lumière subtile dans la chambre à coucher, lorsque ce mode est activé, le 636V2 s’allume automatiquement dans l’obscurité et s’éteint en cas de forte luminosité.

battery powered lights, power outage night light

Lorsque votre appareil est branché sur une prise de courant et réglé en mode Urgency, il s’allume automatiquement en cas de panne de courant. La lampe s’allumera également si elle est débranchée manuellement d’une prise de courant alors qu’elle est dans ce mode, la transformant ainsi en une lampe de poche portable en cas de panne de courant. Le design compact et la construction légère de cette unité la rendent facile à transporter, vous permettant de naviguer dans votre maison sans crainte de rencontrer des obstacles, et vous procurant un sentiment de sécurité.

Le mode Auto offre le meilleur des deux mondes, permettant au 636V2 de conserver à la fois sa fonction Veilleuse et Urgence en fonction de la situation.

Lumières d’urgence polyvalentes en cas de panne d’électricité

Avec ses têtes de lumière à DEL pivotantes et inclinables, le 636V2 offre une solution d’éclairage polyvalente qui vous permet d’éclairer simultanément dans deux directions différentes.

Dans le cas d’une lumière d’urgence à DEL à montage mural, les fentes en forme de trou de serrure à l’arrière de l’appareil permettent également de le monter sur un mur afin d’éclairer les endroits précaires aux surfaces inégales, tels que les escaliers, pour garantir une visibilité optimale en cas d’urgence.

La lumière à DEL 636V2 est une lampe de secours d’intérieur polyvalente et conviviale qui offre le meilleur des deux mondes. Que vous ayez besoin d’une douce lumière nocturne ou d’une puissante lampe de poche pendant les pannes de courant, cette lampe dèurgence à piles pour la maison est faite pour vous. Avec ses têtes pivotantes réglables, ses commandes faciles à utiliser et son mode Auto intelligent, le 636V2 est la solution d’éclairage parfaite pour toute maison.

Faites l’expérience d’une véritable tranquillité d’esprit avec le 636V2 qui fournit un éclairage de secours en cas de coupure de courant. Dites adieu à l’obscurité et embrassez l’éclat de la technologie et de l’utilité. Illuminez votre chemin avec le luminaire d’éclairage de secours rechargeable 636V2 d’Ideal Security.

emergency plug in flashlight, emergency blackout light

Présentation de la poignée de porte extérieure GL : Édition or satiné

Nous sommes ravis d’annoncer le dernier ajout à notre gamme de produits – la poignée GL pour contre-porte et porte moustiquaire (également connue sous le nom de HK01-I-SG), maintenant disponible dans l’élégante finition or satiné. Cette magnifique poignée allie fonctionnalité, durabilité et esthétique, ce qui en fait le choix idéal pour les propriétaires qui souhaitent améliorer l’aspect général et la sécurité de leurs contre-portes et de leurs portes moustiquaires.

La poignée à levier GL

L’ensemble de poignée HK01-I-SG

Design épuré et qualité de fabrication supérieure

La poignée à levier GL pour contre-portes et portes moustiquaires présente un design élégant et contemporain qui ajoute une touche de sophistication à toute contre-portes ou portes moustiquaires. Construite pour résister à l’épreuve du temps, cette poignée de remplacement pour contre-porte et porte moustiquaire conservera son éclat et sa brillance malgré l’utilisation quotidienne et les éléments environnementaux. La finition or satiné s’harmonise avec un large éventail de styles architecturaux, rehaussant l’attrait visuel de l’extérieur de votre maison.

Sécurité renforcée et fonctionnement pratique

La sécurité est primordiale lorsqu’il s’agit de protéger vos proches et vos biens. L’ensemble de poignées de porte avant HK01-I-SG est doté d’un loquet intérieur non verrouillable pour garantir la fermeture de votre porte, et d’un pêne dormant à clé en finition or satiné assortie pour un niveau de sécurité supplémentaire. La poignée est également facile à utiliser, ce qui vous permet, à vous et à vos invités, d’entrer et de sortir sans effort. Plus besoin de tripoter une poignée à bouton-poussoir, il suffit d’une simple rotation de du levier, identique au fonctionnement des poignées de porte intérieures.

Installation facile et polyvalence

Grâce à nos instructions d’installation détaillées étape par étape, l’installation de l’ensemble de poignées de contre-porte GL est un jeu tout simple. Compatible avec la plupart des contre-portes et des portes moustiquaires dont l’épaisseur varie de 1 po à 2 1/8 po, l’ensemble de poignée à levier GL constitue une mise à niveau idéale pour une poignée de remplacement de contre-portes. La poignée GL est conçue pour remplacer la plupart des poignées à montage en surface avec un espacement des trous de 1 3/4 po et n’est pas compatible en tant que remplacement pour les ensembles de poignées à mortaise.

Rehaussez le style de votre maison avec la finition or satiné

Avec sa superbe finition or satiné, la poignée HK01-I-SG apporte une touche d’opulence à votre entrée. Créez une impression durable et rehaussez le style de votre maison avec cette superbe quincaillerie.

Vous cherchez d’autres finitions pour répondre à vos besoins esthétiques ? Nous avons ce qu’il vous faut. Améliorez votre contre-porte ou votre porte moustiquaire dès aujourd’hui avec la GLWV2MB – la même élégance que la poignée GL, avec les avantages supplémentaires d’un loquet intérieur verrouillable, et dans la finition emblématique noir mat. Contrairement aux poignées de porte noires brillantes, la finition noire mate est une tendance croissante qui s’associe à un large éventail de styles de portes et de ferrures. Et si vous recherchez un look complètement différent, envisagez de remplacer votre poignée de porte moustiquaire par notre poignée à levier AJ moderne dans la finition classique argent pour une fusion méticuleuse des styles.

Faites l’expérience d’un mélange parfait de fonctionnalité et d’esthétique, soutenu par un savoir-faire de qualité et une grande durabilité, avec Sécurité Idéale. Faites une déclaration avec votre poignée de porte et laissez une impression durable à tous ceux qui entrent dans votre maison.

N’oubliez pas de consulter notre catalogue complet de quincaillerie pour contre-portes pour plus d’informations !

Introducing The GL Exterior Door Handle: Satin Gold Edition

We are delighted to announce the latest addition to our product lineup – the GL storm door and screen door lever handle (also known as the HK01-I-SG), now available in the elegant Satin Gold finish. This stunning handle combines functionality, durability, and aesthetic appeal, making it the perfect choice for homeowners looking to enhance the overall look and security of their storm doors and screen doors.

The GL Lever Handle

The HK01-I-SG Handle Set

Sleek Design and Superior Craftsmanship

The GL Storm Door and Screen Door Lever Handle boasts a sleek and contemporary design that adds a touch of sophistication to any storm door or screen door. Built to withstand the test of time, this storm door and screen door replacement handle will retain its luster and sheen despite daily use and environmental elements. The Satin Gold finish complements a wide range of architectural styles, elevating the visual appeal of your home’s exterior.

Enhanced Security and Convenient Operation

Security is paramount when it comes to protecting your loved ones and property. The HK01-I-SG front door handle set features a non-locking inside latch to ensure your door is securely shut, and a keyed deadbolt in a matching Satin Gold finish for an added layer of security. The lever handle is also easy to operate, providing effortless entry and exit for you and your guests. No more fumbling with a pushbutton handle is necessary; all it takes is a simple twist of the lever, identical to the operation of interior door handles.

Easy Installation and Versatility

With our step-by-step comprehensive installation instructions, installing the GL storm door handle set is a breeze. Compatible with most storm doors and screen doors that have a thickness ranging from 1″ to 2 1/8″, the GL lever set is an ideal upgrade for a storm door replacement handle. The GL Handle is designed to replace most surface mount handles with a hole spacing of 1 3/4″ and is not compatible as a replacement for mortise handle sets.

Elevate Your Home’s Style with Satin Gold Finish

With its stunning Satin Gold finish, the HK01-I-SG handle brings a touch of opulence to your entryway. Create a lasting impression and elevate your home’s style with this stunning hardware upgrade.

Looking for other finishes to fit your desired aesthetic? We’ve got you covered. Upgrade your storm door or screen door today with the GLWV2MB – the same elegance of the GL handle, the added benefits of a locking inside latch, and in the iconic Matte Black finish. Unlike glossy black door handles, the matte black finish is a growing trend that pairs with a wide range of door styles and hardware. And if you’re looking for a different look altogether, consider replacing your screen door handle with our modern AJ lever handle in the classic Silver finish for a meticulous merging of styles.

Experience the perfect blend of functionality and aesthetics, backed by quality craftsmanship and durability, with Ideal Security. Make a statement with your door handle and leave a lasting impression on all who enter your home.

Be sure to check out our full Storm Door Hardware Catalogue for more information!

Ideal PRO veut que vous travailliez en toute sécurité dans les escaliers avec le Ladder-Aide PRO

Ideal PRO présentera le Ladder-Aide PRO au NSC Safety Congress & Expo en octobre à la Nouvelle-Orléans, au kiosque 4923.

Que vous ou votre équipe entrepreniez un projet d’entretien, de CVC ou de rénovation nécessitant l’installation d’une échelle dans un escalier, le Ladder-Aide PRO est un outil qui vous aidera à commencer le travail rapidement et à l’exécuter en toute sécurité.

Ladder-Aide PRO est un stabilisateur d’échelle qui crée une surface solide, stable et plane pour travailler dans les escaliers en toute sécurité. Grâce à sa construction entièrement en acier et à ses patins antidérapants sur sa base, Ladder-Aide PRO peut supporter 1 500 livres et répond aux normes de taille et de poids des échelles à coulisse en aluminium et en fibre de verre de type I, IA et IAA.

Conçue pour les professionnels tels que les techniciens en CVC, les électriciens, les peintres, et les techniciens d’entretien de bâtiments, la Ladder-Aide PRO est facile à transporter d’un projet à l’autre et s’assemble en 60 secondes.

Pour plus d’informations, visitez le stand #4923, visitez https://www.ladder-aide.com ou contactez-nous à info@idealinc.com.

https://congress.nsc.org/nsc2023/public/enter.aspx

Ideal PRO Wants You to Work Safely on Stairs With the Ladder-Aide PRO

Ideal PRO will be presenting the Ladder-Aide PRO at the NSC Safety Congress & Expo this October in New Orleans at Booth #4923.

Whether you or your team are undertaking a maintenance, HVAC, or renovation project that involves setting up a ladder on a staircase, the Ladder-Aide PRO is a tool that will help you start the job quickly and execute it safely.

Ladder-Aide PRO is a ladder stabilizer that creates a strong, stable, level, surface to work on stairs safely. With an all-steel construction and non-slip pads on its base, Ladder-Aide PRO can support 1500 lbs and meets the size and weight standards of Type I, IA and IAA aluminum and fiberglass extension ladders.

Designed for pros such as HVAC technicians, electricians, painters, contractors, building maintenance technicians, the Ladder-Aide PRO is easy to carry from one project to the next and takes 60 seconds to assemble.

For more information, stop by Booth #4923, visit https://www.ladder-aide.com or contact us at info@idealinc.com.

Learn more at https://congress.nsc.org/nsc2023/public/enter.aspx.